Tuesday, May 26, 2009

Summer Grilling, Apartment Style


One of my favorite tastes associated with summer is that of the distinctive flavor of the grill. Fortunately, many people seem to agree with me, and so I have already attended several cookouts. However, it is difficult for me to replicate this small pleasure while at home, since I live in a small apartment in the city. My kitchen has no windows, and consequently, very poor ventilation.

I try to make the best of my minuscule kitchen, and I admit that I am rather proud of my ability to cook a wide variety of things within its tight confines. However, one thing that I can't do inside of it is grill, even on an indoor grill pan. The amount of smoke that such pans produce would be too great for my little home, and it's even possible that an attempt to use one would set off the building's fire alarms, and bring fire truck, and I have to assume that such a calamity would be unspeakably embarrassing.

However, just because I can't grill doesn't mean that I can't make one of my favorite grill foods: hamburgers. I preheat my oven to 350 degrees, and place my burgers on top of a rack placed over a cookie sheet. The burgers take twenty to thirty minutes to cook. While they might not have that charcoal taste and classic grill marks, you also don't have to coax a grill to light, fight against winds, or anything else. And I like to add a bit more flavor to my burger mix to make up for the smokiness.


Onion Fontina Burgers
I used fontina cheese, but any flavorful cheese that is slow to melt (usually harder cheeses) would work nicely (perhaps some asiago).

Makes four 1/4 lb burgers

Ingredients

1 cup fontina cheese
1 lb. ground beef
salt and pepper, to taste
1 egg
1 cup bread crumbs
1 small onion (yellow or white)

Preheat the oven to 350 degrees Fahrenheit.

Begin by grating the cheese directly into a medium/large mixing bowl. Place the ground beef on top, and season with salt and pepper.

Add the egg and bread crumbs, then peel and grate the onion on top of everything.

Allow the mixture to sit for a minute or two, then mix together thoroughly, using hands or a spoon (I like to use my hands so I can really mix everything). Allow to rest for a few more minutes, then shape into burgers. Indent the middle of the burgers a bit in order to prevent them from fattening up and cooking unevenly. Place the burgers on top of a rack, placed on top of a baking sheet. Allow to rest again before placing in the oven.

Set a timer for twenty minutes. Allow to cook, checking one or two times. After then twenty minutes, take the burgers out of the oven, check for doneness, and turn them over. Cook the burgers for another five to ten minutes, depending on how well you like them to be cooked.

After removing the burgers from the oven for the final time, allow them to rest a bit. Keep in mind that the burgers will continue to cook a bit more after they are removed from the oven. Serve alone, or atop crusty bread. Spicy mustard and fresh vegetables are a nice addition.

Thursday, May 21, 2009

There's Always Room for Bread and Cheese


I often think of a story I read years ago when McD's was expanding through Europe. When they started building restaurants in France, the farmers rebelled. First they began dumping loads of manure in the parking lots. Later they opened competing "fast food" stands on roadsides near the restaurants. The farmers' stands offered a quick lunch of cheese and fresh baked bread. Sounds good, but I'm not sure how effective it was since Europe now teems with McD's. But still, I like the idea of some quick homemade bread with cheese and/or soup. Maybe for Memorial Day weekend I should be talking watermelon and lemonade, but we've had enough cool weather in May to justify occasional bread and soup.

This is a quick and simple loaf of Italian style bread. Most homemade bread loses flavor after the day it is baked. This one will too, but all of the butter keeps it moister than most and it makes great toast for days. I've had the best results with bread flour, but it works out well with plain old white flour too. Someday I'll try the artisan flour.


Italian Bread in Two Hours


4 tablespoons butter
1/2 cup hot water

3 teaspoons yeast
2 teaspoons sugar
3/4 cup warm water

1 1/2 teaspoons salt
About 4 cups bread flour

1 egg mixed beaten with 1 tablespoon of water for wash
========
Start by melting the butter in the hot water. Allow this mixture to cool while preparing the other ingredients.

Place the yeast into the warm water. After the yeast begins to foam, add the sugar. Allow this to sit for 5 to 10 minutes. Add in the butter/water mix, making sure it has cooled enough to not kill the yeast! Then add the salt to the mixture.

Stir in flour starting with one cup and then gradually adding until a dough ball begins to form.

Place the dough on a floured surface and knead until smooth. When kneading is finished allow it to sit for 2 to 5 minutes. Using your hands, flatten the dough into a rectangle of about 9 X 14 inches. Roll this into a cylinder shape and then, using a small amount of water on the fingers, work the ends under and into closed, classic tapered ends.

Move the formed dough onto a parchment-covered baking sheet. Allow it to rise for one hour. Preheat the oven to 425 degrees. With a very sharp blade, carefully cut 5-7 slashes along the top of the loaf. Be careful to not compress the dough. Brush the loaf with the egg wash and then allow the dough to rise for a few more minutes while the oven heats. Bake for 20 to 25 minutes, or until it has the golden color and hollow sound. Allow to cool before slicing. Add some cheese and imagine you're in France. Manure pile optional.

Wednesday, May 20, 2009

Getting to be a Certain Age

Some of the more recent posts on this site point to the evidence: I have reached that point in life whereupon it is appealing to me to make homemade bread. I honestly never thought that this would happen to me. Baking my own bread seemed too complicated and labor intensive. It is easy to purchase bread of a decent quality at any number of bakeries and grocery stores.


That was before I realized that it could be rather fun to make bread. It has also proven to be more economical and not nearly as difficult as I imagined. And so, with little realization until now, I have begun this new quasi-life stage. Who knows where it will take me? I only know that I still have much to learn. One of my next projects (I think) will be to make my own sourdough starter.


This past weekend, I decided to use some leftover whole wheat flour to make two loaves of honey wheat bread. Though whole wheat bread is often very tough, this was nutty and soft (I think the presence of canola oil helped with this), with a nice, crispy crust on the outside. I froze one loaf, and I have been happily munching through the other, toasted with a little butter, for breakfast.

Sunday, May 17, 2009

No More Than a Pretty Face...

I had really high hopes for these cookies, as found on The Wednesday Chef. Despite all of the chocolate and butter the recipe contains, the flavor really isn't there.

However, they look perfect.


After reviewing other recipes online, I've found that the majority of chocolate crinkle cookies contain espresso, vanilla, or cognac. I have to assume that this additional flavoring is what is missing from the San Andreas cookies. However, I have attempted an espresso-chocolate crinkle cookie from the December 2008 issue of Cooking Light. This recipe called for instant espresso granules, which I couldn't find. Since several commenters stated that they used a shot of espresso instead, this is what I used. The cookies tasted fairly good, but they were not pretty to look at, and I didn't care for the texture.

However, the point of this post is not to complain about failed attempts at chocolate crinkle cookies. I want to perfect a recipe for these cookies, maybe using cognac, though espresso or vanilla would be easier. Does anyone have any ideas or alternate, better recipes for such cookies? I am not an extremely experienced baker, so I am not entirely sure where to begin here, except to add vanilla to the San Andreas recipe. As you can probably tell from the picture, these cookies look beautiful, so the flour and baking powder ratio is correct, I think. In place of almond meal, I crushed some slivered almonds in a zip-lock bag with a rolling pin. This doesn't really add to the flavor, but it does lend a nice, crunchy texture to the otherwise rather cake-like cookies.

I used Ghiradelli chocolate chips, which I have had success with before, and they melt down (and taste) much better than most chocolate chips. However, now I am wondering if that was a good idea.

If anyone has any thoughts, or experiences making this type of cookie, please share. I'd love to find a way to make them more flavorful. When I make them again, I will report back to record my progress. I'm looking forward to hearing your ideas.

Thursday, May 14, 2009

Happy Birthday, John K!


In honor of John K's birthday, I tried a recipe from one of his favorite bakers, Bernard Clayton. These are described as breakfast rolls, and are quite delicious when paired with tea or coffee. That said, I found them to be tasty as an afternoon snack. I originally discovered the recipe on The Wednesday Chef, and I knew that I just had to try them. The rolls taste best, naturally, fresh from the oven. After a day or two, they are certainly edible, but toasting them with a little butter really improves the flavor and texture at this point. I would also like to taste a little more honey and more lemon in the rolls. Finally, I don't really feel that placing a pan of ice on the oven floor really did much to improve the the crusty texture of the bread. This may have been the fault of my crazy oven, but the steam rising from the bottom of the oven caused the underside of the rolls to cook faster. The rolls don't taste burnt, but some of them certainly look over-cooked. I would, however, make them again.
I did not follow the kneading instructions exactly as printed on Luisa's blog. Luisa follows the food processor method to prepare the bread, which is one technique that Bernard Clayton offers. In his book, Bernard Clayton's New Complete Book of Breads , he gives instructions on how to make the bread by hand. As I did not have access to the hand-kneaded version of the recipe, I made my own directions at this point. I must admit that I was proud of myself when the rolls turned out well, since I don't know too much about making bread! Below is the technique that I used to knead the bread by hand. As it is pretty basic, it most likely bears a strong resemblance to the book's instructions.

Bernard Clayton's Honey-Lemon Whole-Wheat Rolls
Makes about 24 rolls

3 cups bread flour
2 envelopes dry yeast (or just over two tablespoons)
2 teaspoons salt
2 1/4 cups hot water (120 to 130 degrees)
1/4 cup honey (using more would give a stronger flavor of honey)
3 tablespoons butter at room temperature
Grated zest of 1 lemon
2 to 3 cups whole-wheat flour
Oil, for brushing on top of the rolls before baking

1. In a very large bowl, mix together the bread flour, yeast, salt, hot water, honey, butter and lemon peel to the bowl of the processor. The ingredients will form a batter-like dough. Stir in 1 to 1 1/2 cups of whole-wheat flour. Blend well. Let the batter rest for 3 minutes, until the whole-wheat flour has been absorbed. Commence stirring and gradually add 1 to 1 1/2 cups whole-wheat flour. At this point, the dough should be soft and a bit sticky, but a solid (not hard) mass.

2. Discard your spoon, if you have not already done so, and knead until the dough begins to stay together. If your bowl is big enough, you can continue to knead inside of it. If you need more room, turn the dough onto a lightly floured board. It will be sticky but light. Add sprinkles of bread flour or all-purpose flour as necessary and knead by hand. You may be kneading for up to 10 minutes, adding flour, as needed, until the dough is smooth and elastic. Test to see if you've kneaded enough by slapping your hand on the dough, holding it there for a count of 10, then lifting your hand up. If bits of dough stick or cling to your hand, continue to knead, adding flour. If the hand comes off clean, the dough's ready for the next step.

3. Form the kneaded dough into a mound and cover it with wax paper or a clean dish towel. Let it rest for 20 minutes.

4. Knead the dough for 30 seconds to press out any air bubbles. Using a sharp knife or dough blade, cut off pieces of dough a little bigger than golf balls. Roll between your hands to form balls. Place each ball on a parchment-lined cookie sheet, flattening slightly with the palm of your hand.

5. Brush the rolls with oil (I used light-tasting olive oil, do not use extra-virgin olive oil). Cover with plastic wrap that is loose enough to allow the rolls to rise but is sealed around the edges to hold in the moisture. Place the sheets of rolls in the refrigerator overnight.

6. Remove the rolls from the fridge and let them sit, covered, at room temperature for 25 minutes while the oven heats to 400 degrees. Place a small cake pan on the floor of the oven to heat as the oven heats. Have about a dozen ice cubes ready.

7. Uncover the rolls. Place them in the oven, then quickly and carefully place the ice cubes into the hot pan on the bottom of the oven (steam will rise immediately) and close the oven door. Bake for 25 to 30 minutes, until the rolls are browned and sound hollow when tapped on the bottom.

Tuesday, May 12, 2009

Roast Chicken


I've been feeling nostalgic lately for some of the foods I first learned to prepare while in high school and college. One of my favorite dishes to make was a roasted chicken with garlic, lemon, honey and herbs. It was originally printed in Yankee Magazine, sometime around 1996. The recipe is not available on the magazine's online archives, so I decided to reproduce it from memory.
While the chicken I made is not not exactly as I remember it, the result is a warm-tasting, savory-sweet chicken dish. It is surprisingly flavorful, given the relatively small number of ingredients used. Below is my version of Honey and Lemon Roasted Chicken.

Honey Lemon Roasted Chicken
Adapted from Yankee Magazine
-1 4 to 5 pound roasting chicken, preferably organic or kosher
-1 lemon half, juiced; the lemon reserved
-2 or 3 whole garlic cloves, peeled
-1 1/2 tablespoons chopped garlic (I used garlic from the jar), or about three medium-sized cloves
-1/8 cup honey
-1/8 cup olive oil, plus more, for rubbing the chicken
-salt and freshly cracked black pepper, to taste
-Four springs fresh rosemary or thyme (optional, or to taste

Preheat the oven to 350 degrees Fahrenheit. Rinse the inside and outside of the chicken and pat dry with paper towels. Trim any excess fat. Place the chicken in a large glass pan. Place the whole garlic cloves and juiced lemon half inside the cavity of the bird. Drizzle olive oil on the outside of the bird, then sprinkle with salt and pepper and rub into the skin. Place in the oven and allow to roast for 20 minutes.
Meanwhile, mix the rest of the olive oil with the honey and lemon juice, then add the chopped garlic, salt and pepper. After the chicken has been in the oven for 20 minutes, remove from oven and baste with the lemon and honey mixture.
After basting, place back in the oven for another 20 minutes, then remove and baste with the lemon and honey mixture. Spoon the juices on the bottom of the pan over the chicken. Continue this pattern until the chicken is thoroughly cooked. Roasting chickens typically require 18 to 20 minutes per pound for cooking when there is no stuffing inside the cavity. Allow the chicken to rest 15 minutes before carving.
If desired, use the extra pan juices to make a gravy to spoon over the meat.

Sunday, May 10, 2009

Wow!


I saw this in the Sur la Table catalog this weekend. I am really curious to know how well it would work on things like bread and pizza. As soon as I saw this oven, I thought of the bialys post from last week.

*photo from surlatable.com

Wednesday, May 6, 2009

Halcyon Days


Late Friday morning, I decided to throw a Kentucky Derby party. Because of the short notice, the guest list only consisted of Sean, my sister Rachel, her husband Patrick, and myself. Sean's dog, Pookie, was also present. She loves my cooking, and always sparks a conversation, so she is a great guest!


For the party, I served mint juleps (of course). I used powdered sugar, as other recipes recommend, instead of fine sugar, like the video.

I also attempted to make oven fried chicken from a recipe I found on the Food Network. It did not turn out well. I think it was because I used boneless, skinless chicken, instead of bone-in chicken with skin. I like fried chicken, but I hate the skin. Next year, I will try something else.

However, the food was redeemed by the presence of these biscuits. They have a sweet, creamy, buttery flavor, though there is not much butter in the recipe. After they were gone, I found myself thinking about them, wanting to make another batch. I wanted to hide them, so these morsels of buttery fluff would be all mine. Though the biscuits are very simple to prepare, they are not exactly health food, so I will have to save them for special occasions (does the Preakness count?).

Rachel also made a lemon buttermilk chess pie that she found on the Cooking Light website. She also defrosted some frozen berries and served them on top. The pie tasted a lot like cheesecake, but much lighter. I highly recommend!

Tuesday, May 5, 2009

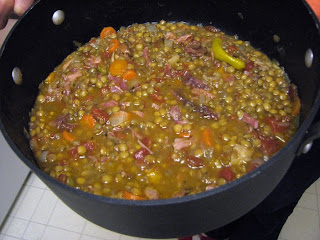
Tastes Even Better Than It Looks!


My apologies to the vegetarians, but whenever I think of ham, I think,“Not just food, but the best food of all!” That's not just me talking. It's a memorable line from Thomas Cahill’s How the Irish Saved Civilization.

Cahill describes a 5th century scene where St. Patrick and his companions are near starvation. Patrick recommends a prayer for food. A moment later a herd of pigs comes stampeding toward them. "Not just food..."

I happen to also be a big fan of lentil soup. So a combination of ham and lentils is irresistible. My eternally lovely and talented wife found a way to make the combination even more irresistible. Below is her own fairly easy and very flavorful ham and lentil soup. The trick might be acquiring a ham bone. The surest way is to purchase a ham and eat most of what surrounds the bone. A small piece of ham might work nearly as well. A ham hock would probably be good too.


Mary K's Ham and Lentil Soup


Ingredients:

1 meaty ham bone
1 1/4 cup lentils, rinsed and picked over (and Mary K can really pick over a lentil!)
1 medium onion, chopped
2 garlic cloves, crushed
1 can diced tomatoes with liquid
1 cup carrots, sliced
2 peperoncini peppers (Tuscan peppers,or sweet Italian peppers, etc. Mary K actually uses the peppers included with a Papa John's pizza.)
1 large OR 2 small bay leaves
1 quart of water

Combine all of these ingredients in a large soup pot. Bring to boil. Lower heat and simmer one hour, or until lentils become tender. Remove ham bone and trim ham from bone into soup. Remove peppers if desired before serving.

Makes about 8 cups.

Monday, May 4, 2009

A Taste of Spring

Before we get to today's recipe, I wanted to follow up on a few things that I have mentioned before.

Firstly, I purchased an oven thermometer over the weekend. I found that my oven is at least 25 degrees too hot. All day Sunday, I worked with my oven to perfect the temperature while I made these cookies . Fortunately, they are so low-maintenance that I think they could be baked at a wide range of temperatures.
Secondly, I made some flatbread, also on Sunday, with some of my homemade pizza dough that was in the freezer. This was the first time I had used it. It tasted good, but the texture was rather tough and floury. I intend to use the dough that I have made, but the next time I make more pizza dough, I am going to have to follow Gallant's lead. As you can see in the picture, Gallant really enjoys his baked dough.

Now, to the recipe that I wanted to talk about today:


Last week, I made an asparagus risotto from the April 2009 issue of Cooking Light. For a Cooking Light recipe, this creamy, cheesy risotto is positively decadent. It calls for 1/4 cup heavy whipping cream! I used regular heavy cream, but after having eaten the dish, I think half and half would be adequate. Possibly whole milk, but anything less would be very watery. I also made a few other changes to the recipe, as I don't really see the purpose behind pureeing some of the raw asparagus. You can find the original recipe here. Regardless of which way you decide to make it, the end result is delicious.


Asparagus Risotto
Adapted from April 2009 Cooking Light
When making this recipe, it is most nutritious to use asparagus that has been grown locally, as it should be the freshest. While most risotto recipes command that you stir the risotto constantly, I have found that this is not entirely so. It is necessary to stir the risotto very frequently, and to keep an eye on the dish when not doing so. However, a risotto is a not a delicate sauce that will scorch immediately. It is completely possible to work on another, less high-maintenance, dish while cooking your risotto.


* 3 cups fat-free, less-sodium chicken broth or vegetable broth
* 1 1/2 cups water
* 1 tablespoon butter
* 2 cups chopped onion (about 1 large)
* 2 cups uncooked Arborio rice (it is recommended to use Arborio because its starchiness binds the ingredients together)
* 1/2 cup dry white wine
* 4 cups asparagus, cut into thirds (about 1 1/2 pounds or one large bunch)
* 3/4 cup grated Romano cheese, divided
* 1/4 cup heavy cream or half and half
* 1 teaspoon salt
* 1/2 teaspoon freshly ground black pepper
* 1/4 cup or less Fontina Cheese (or another flavorful cheese), for grating over top before serving.

In a small sauce pan, combine broth and water. Bring to a simmer, but do not boil. Keep warm over low heat.

Melt butter in a large heavy saucepan over medium heat. Add onion to pan; cook 8 minutes or until tender, stirring occasionally. Stir in rice; cook 1 minute, stirring constantly (you want to let the rice toast a bit). Stir in wine; cook 2 minutes or until liquid is nearly absorbed, stirring almost constantly. Add 1/2 cup broth; cook 2 minutes or until the liquid is nearly absorbed, stirring almost constantly. Add remaining broth, 1/2 cup at a time, stirring almost constantly until each portion of broth is absorbed before adding the next (about 30 minutes total). About halfway through adding the broth, fold in half of the asparagus. Around the last 1/2 cup of broth, stir in remaining asparagus and continue to stir until the broth is absorbed.

Stir in 3/4 cup cheese, cream, salt, and pepper. Transfer risotto to a bowl. Grate fontina directly onto individual servings.

Sunday, May 3, 2009

Something Like Polish Bread


I've never found a way to recreate the taste of European bread at home. When I was a lad in Pittsburgh, there was a bakery in the Lower Hill area. I think it was called The Mayflower Bakery. They made bagels and rolls that were like heavenly delights. My dad used to go there early on Sunday mornings and bring back a bag of each for breakfast. The rolls were the true European style bread with a crisp crust and a soft, sweet interior. I know that the texture of European flour is a little different from the flour we buy in the supermarket. I've tried some different bread flour and some day I'll get around to trying the King Arthur European-Style Artisan Bread Flour. Some day I might even make it to Vermont for the King Arthur factory tour. But it takes more than European flour to match the texture of European bread. A run-of-the mill kitchen oven won't do it. I've tried the tricks to create steam in the oven, but it really doesn't help much.

I wish I had a picture of Tom's face when he bit into his first bread roll in Krakow. We had no problem locating a bakery by scent alone. It was a good one too. Just around the corner from the main square in central Krakow and literally in the shadow of the Basilica of the Holy Trinity. This was really a religious experience. I was afraid that maybe I had talked the bread up too much and that Tom might be disappointed. No problem! His eyes widened and he drifted into ecstasy with a single bite. We went back there every morning. Sometimes more than once.

BIALYS
Bernard Clayton has a recipe for bialys, a Polish bread roll. They won't carry you away to Krakow, but they're pretty good. The recipe calls for onion flakes. I've made them with dried onion flakes, with chopped onion and without any onion at all. I've liked them each way, but the dried onion flake form seems to have the most unique and memorable taste.

Reprinted for educational purposes from Bernard Clayton's New Complete Book of Breads.
Enough for 2 dozen rolls.
Ingredients:
Filling
2 tablespoons onion flakes
2 teaspoons poppy seeds
1 tablespoon vegetable oil
1 teaspoon salt (Kosher salt is better)

Dough
4 1/2 cups flour
5 teaspoons sugar
2 teaspoons salt
1 package dry yeast
1 3/4 cups hot water

Soak onion flakes in water for about 2 hours. Drain and press out the water with a paper towel. (You can probably skip this step if using fresh onion.) Combine minced onion in bowl with poppy seeds, salt and oil. Set aside for later use.

Combine 3 cups of flour in a bowl with all of the dry ingredients for the dough. Stir together and form a "well" in the flour. Pour in the hot water. Mix together to make a dough batter, adding small amounts of flour until the dough begins to pull away from the sides of the bowl. This can be done by hand or with a Kitchen Aid style mixer.

Knead the bread for about 10 minutes using the Gallant Method.

Place the kneaded dough into an oiled bowl, cover with plastic wrap and allow to rise at room temperature for about one hour.

Punch the dough down, re-cover and allow it to rise a second time for about 45 minutes.

After the second rise, divide the dough into 24 relatively even pieces. The quickest way to do this is by dividing the dough ball in halves, then in halves again. Then divide each of the four resulting balls into 6 same-sized pieces. I generally just eye-ball this, but they can also be weighed out.

With your hand or with a rolling pin, press each of the 24 small dough balls into flat, round circles. They should be about 1/2 inch thick and 3 to 4 inches in diameter.

Allow the dough circles to rise another 30 minutes

After the 30 minutes, very carefully depress a small area at the center of each circle with your thumbs. Try to not deflate the surrounding dough. Stretch the flattened area outward into a well that is about 1 inch to 1 1/2 inch in diameter. Place about a 1/2 teaspoon of the onion filling into each well.

Allow the dough to rise yet another time for about 25 minutes.

Preheat oven to 450 degrees. Bake for about 15 to 20 minutes. I have found it best to bake one dozen at a time in a regular-sized kitchen oven. Check frequently after about 13 minutes since 450 degrees can burn quickly. After baking, place on wire cooling rack. Use pot holders!